Play Kid
A DMG Game Boy emulator written in Rust
Play Kid is yet another Game Boy emulator, written in Rust. But hey, it is MY Game Boy emulator, and I’m proud of it. I wrote some words about its development here. Find all posts about Play Kid here.
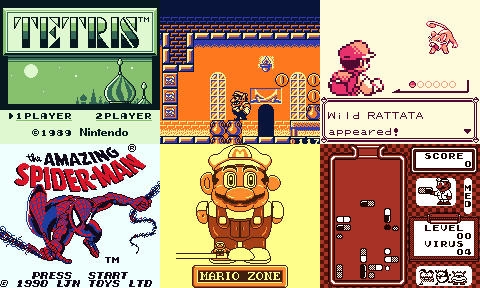
Play Kid running different games with different color palettes.
Here are the main features of Play Kid:
- All CPU instructions implemented.
- Full memory map implemented.
- Modes: ROM, MBC1, MBC2, MBC3.
- Audio is implemented, with 4 channels, envelopes, sweep, and stereo.
- Supports game controllers.
- Multiple color palettes.
- Save screenshot of current frame buffer.
- FPS counter.
- Respects 160:144 aspect ratio by letter-boxing.
- Debug panel:
- Step instruction.
- Step scanline.
- Pause/continue current execution.
- Displays internal state of CPU, PPU, and Joypad.
- Full program disassembly, with breakpoints.
- Save RAM to
.savfiles to emulate the battery-backed SRAM. Those are saved every minute. - Working games/roms:
- Passes
dmg-acid2 - Tetris
- Pokémon
- Super Mario Land
- Super Mario Land 2: 6 Golden Coins
- Wario Land (Super Mario Land 3)
- Wario Land II
- Bugs Bunny Crazy Castle
- The Amazing Spider-Man
- Dr. Mario
- Probably many, many more
- Passes
- For Linux, macOS, and Windows.
Downloads
You can grab packages for Linux, macOS, and Windows here:
Build
Build the project with cargo build.
Run
The usual Rust stuff.
cargo run
You can also pass in a ROM file with cargo run -- your-rom.gb.
Make the binary with:
cargo build --release
Operation
If you don’t pass in any ROM file as an argument, you need to select using the top menu bar, File▶Open ROM….
Here are the Joypad keyboard mappings:
- enter - Start button
- space - Select button
- a - A button
- b - B button
The keyboard is clumsy for playing Game Boy games, so you can use any game controller. Controllers are detected when hot-plugged.
Additionally, there are some more actions available:
- p - change the palette colors
- w - trigger the SRAM save operation to
.savfile. - f - toggle FPS monitor
- s - save a screenshot, with name
screenshot_[time].jpg - d - enter debug mode
- Esc - exit the emulator
You can also use the provided UI.
Debug panel
You can open the debug panel any time by pressing d, by clicking on Machine▶Debug panel…, or activate it at launch with the -d/--debug flag. The debug panel shows up in a translucent window. It provides a view of the internal state of the emulator, with:
- Current address, instruction, operands, and opcode, to the top.
- Internal state of CPU, PPU, and JOYP, to the left.
- Disassembly of the program, to the right.
- Breakpoints.
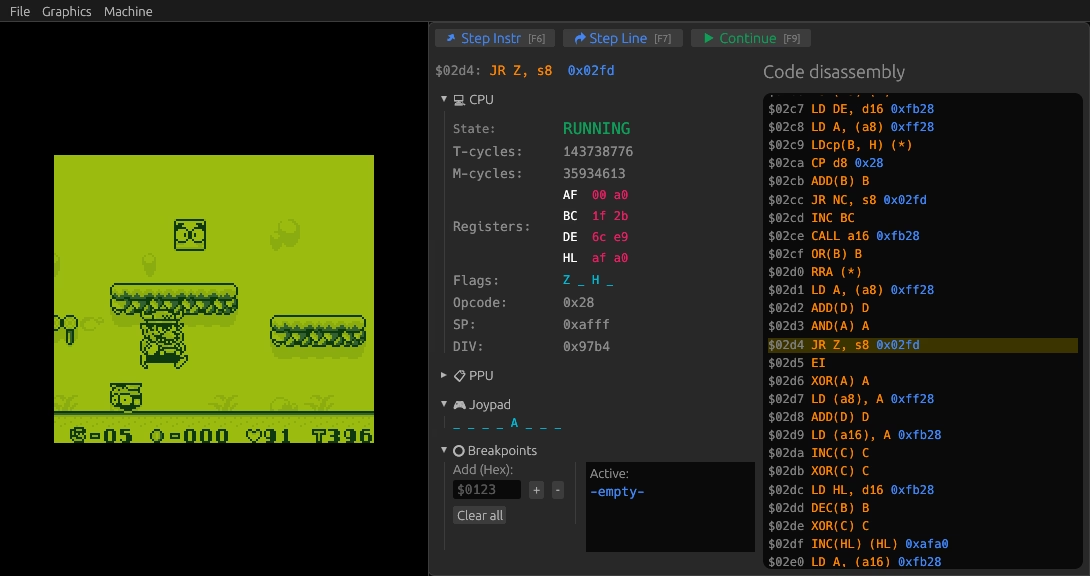
The debug panel, showing the machine state and a code disassembly.
You can use the provided UI controls to work with debug mode. You can also use the keyboard. These are the key bindings:
- F6 - step a single instruction
- F7 - step a scanline
- F9 - continue execution until breakpoint (if paused), or pause execution (if running)
- r - reset the CPU
- d - exit debug mode and go back to normal full-speed emulation
- Esc - exit the emulator
You can also use breakpoints. A list with the current breakpoint addresses is provided at the bottom. To create a breakpoint, either click on the address in the disassembly panel, or enter it (in $abcd format) into the text field and click +. Remove a breakpoint by clicking the × in the breakpoints list. Clear all current breakpoints with Clear all.
Playing around with the Play Kid debug UI.
CLI args
There are some CLI arguments that you can use:
Play Kid 0.4.0
Toni Sagristà - tonisagrista.com

Minimalist Game Boy emulator for the cool kids.

Usage: playkid [OPTIONS] [INPUT]

Arguments:
  [INPUT]  Path to the input ROM file to load

Options:
  -s, --scale <SCALE>  Initial window scale. It can also be resized manually [default: 4]
  -d, --debug          Activate debug mode. Use `d` to stop program at any point
  -f, --fps            Show FPS counter. Use `f` to toggle on and off
      --skipcheck      Skip global checksum, header checksum, and logo sequence check
  -h, --help           Print help
  -V, --version        Print version
SDL2 version
Play Kid started as an SDL2 application, but it was moved to a pure Rust tech stack using pixels, winit, egui, and rodio. This makes it much easier to build for different targets (including WASM!). Additionally, the SDL2 version contains a minimalist homegrown UI library that I’m particularly proud about, but it can’t hold a candle to egui. It looks like this:
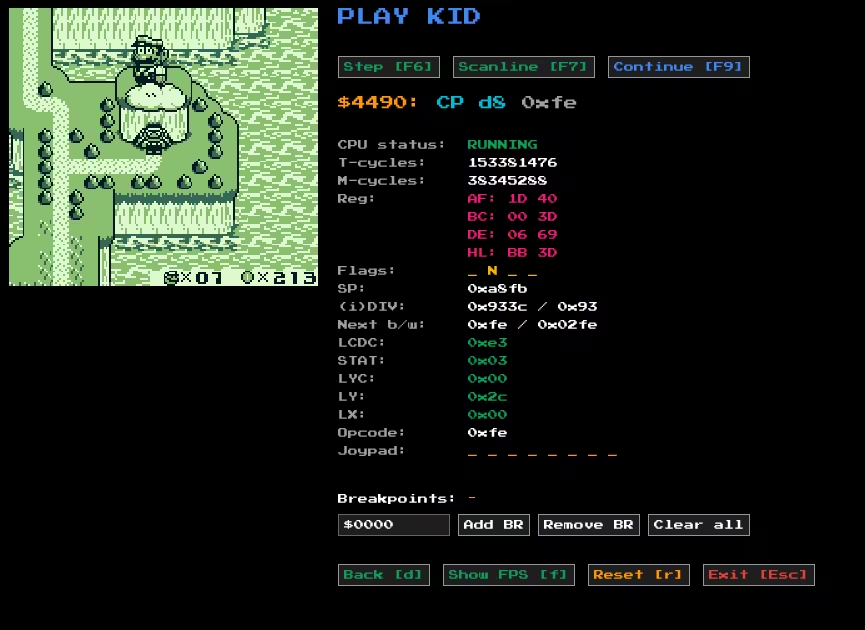
The debug mode.
The SDL2 version is forever tagged playkid-sdl2 (playkid-sdl2@codeberg, playkid-sdl2@github).
Useful links
- Pandocs: https://gbdev.io/pandocs/
- Complete tech reference: https://gekkio.fi/files/gb-docs/gbctr.pdf
- Game Boy CPU manual: http://marc.rawer.de/Gameboy/Docs/GBCPUman.pdf
- Game Boy CPU instructions: https://meganesu.github.io/generate-gb-opcodes/